| Page 1 |
Table of Contents
What do the buttons the left do? ................................................................................................................. 1
What do the colors on the table mean? ....................................................................................................... 2
What are the numbers on the tables?
................................
................................
................................
..........
2
How to seat a table ....................................................................................................................................... 3
How to complete an order
................................
................................
................................
............................
5
How do I switch rooms?
................................
................................
................................
................................
6
Where do I edit my TableMapp? .................................................................................................................. 7
How do I create a new room?
................................
................................
................................
.......................
7

How do I delete a table/seating group from the map?
................................
................................
..............
10
How do I evenly space my tables?
................................
................................
................................
..............
10
What do the numbers on the right of the screen mean?
................................
................................
...........
12
How do I get the table number to print on my order ticket?
................................
................................
.....
13
I just created new menu items, but they are not printing
................................
................................
..........
14
Orders are printing from some devices, but not others
................................
................................
.............
15
The app is running slow
................................
................................
................................
..............................
16
I made changes to my existing floorplan but my app does not show these changes
................................
16
How do I limit my employees from accessing tables/orders that are not theirs?
................................
.....
18
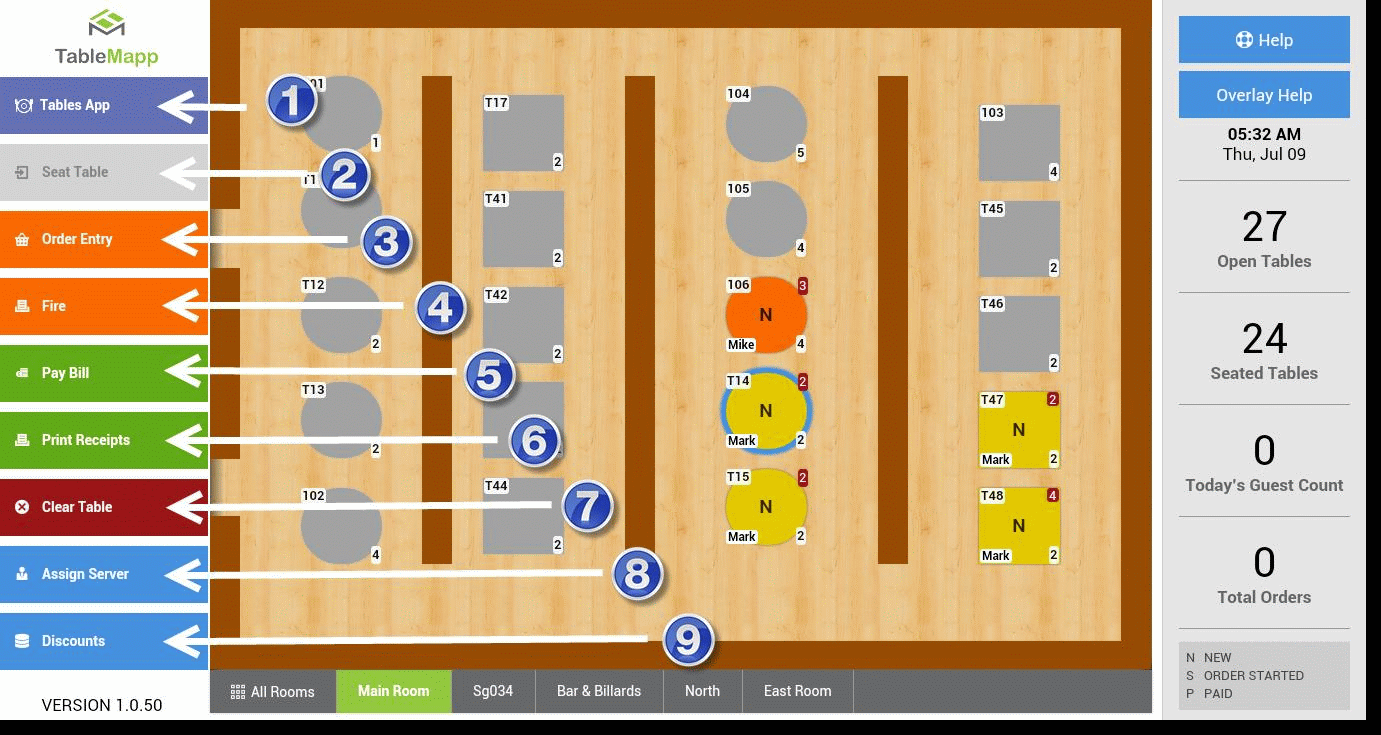
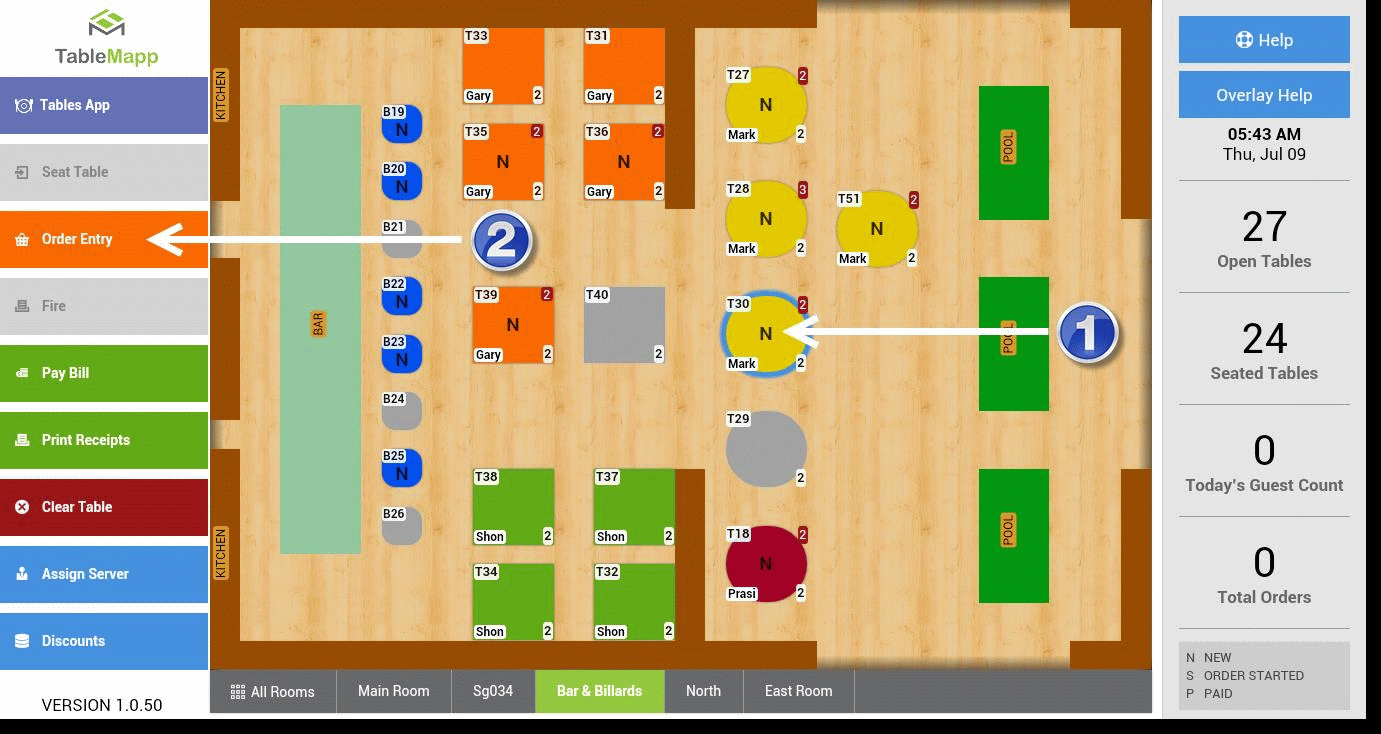
What do the buttons the left do?
This is referred to as your menu bar. Here you can have access to all basic functions of TableMapp.
1. TABLES APP – This is a fast access to the Tables App
2. SEAT TABLE – When enabled, this will allow you to seat the table
3. ORDER ENTRY – This will open the Register app and allow you to begin ordering
4. FIRE – This will send the ordered items to the appropriate printer or KDS. This is only enabled
when there are items that have not been fired yet. Once they have been fired, this will be
disabled.
5. PAY BILL – This will bring you to payments where you can complete the bill pay

1 | P a g e
| Page 2 |
6. PRINT RECEIPTS – This allows you to print the bill, print a gift receipt, and print the order
7. CLEAR TABLE – This will allow you to clear the table. This will remove the guest and the server
from the table turning it gray. This can only be completed when items have been either paid or
voided.
8. ASSIGN SERVER – This will allow you to choose the server you wish to assign to the selected
table.
9. DISCOUNTS – This will allow you to apply a discount to the selected table.
What do the colors on the table mean?
1. Yellow – These are tables that are assigned to you.
2. Gray – these are tables that are currently open. You may choose these to seat new guests.
3. Any other color represents they are tables currently in use by another server. Each server will
automatically be given a specific color.
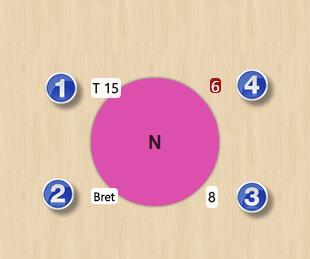
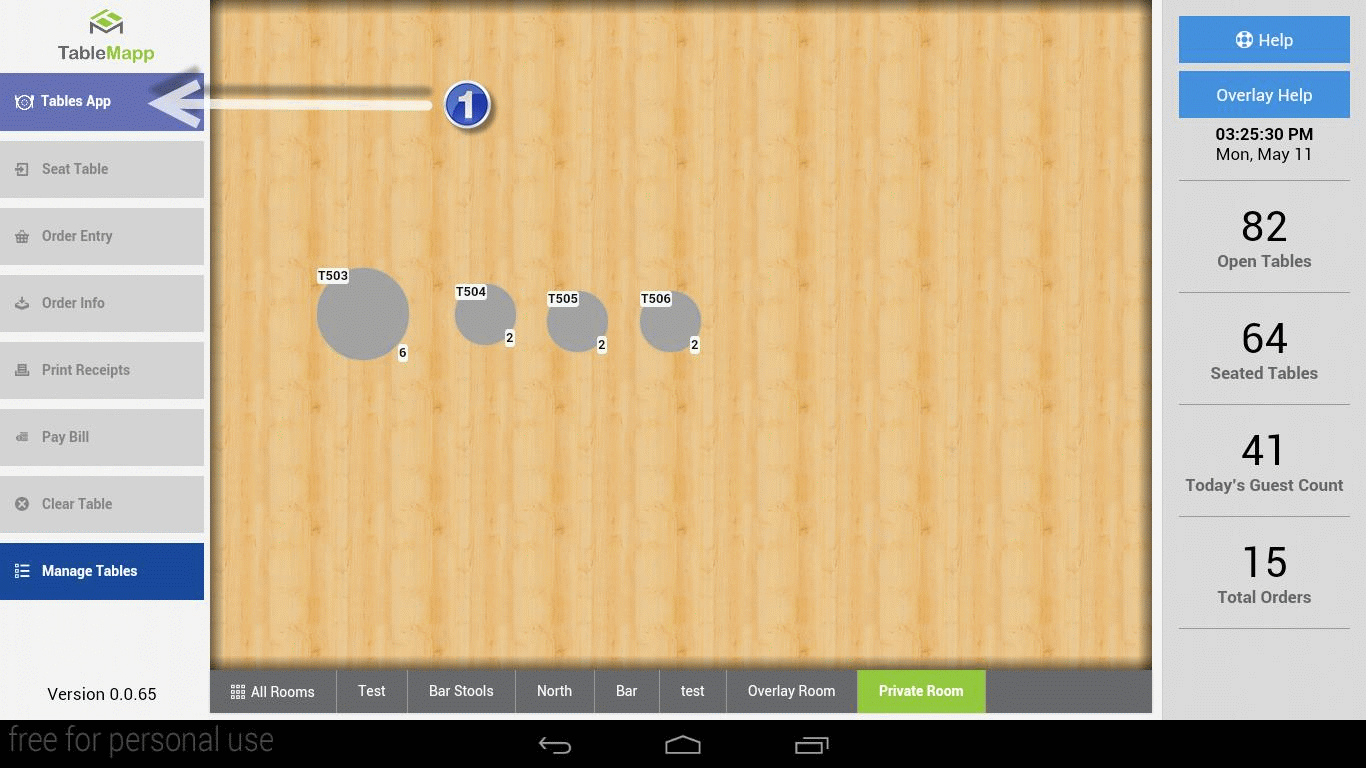
What are the numbers on the tables?
Each table will give you a good amount of information. No matter the shape or size of the table, you will
receive the same information.
2 | P a g e
| Page 3 |
w many guest the table can seat
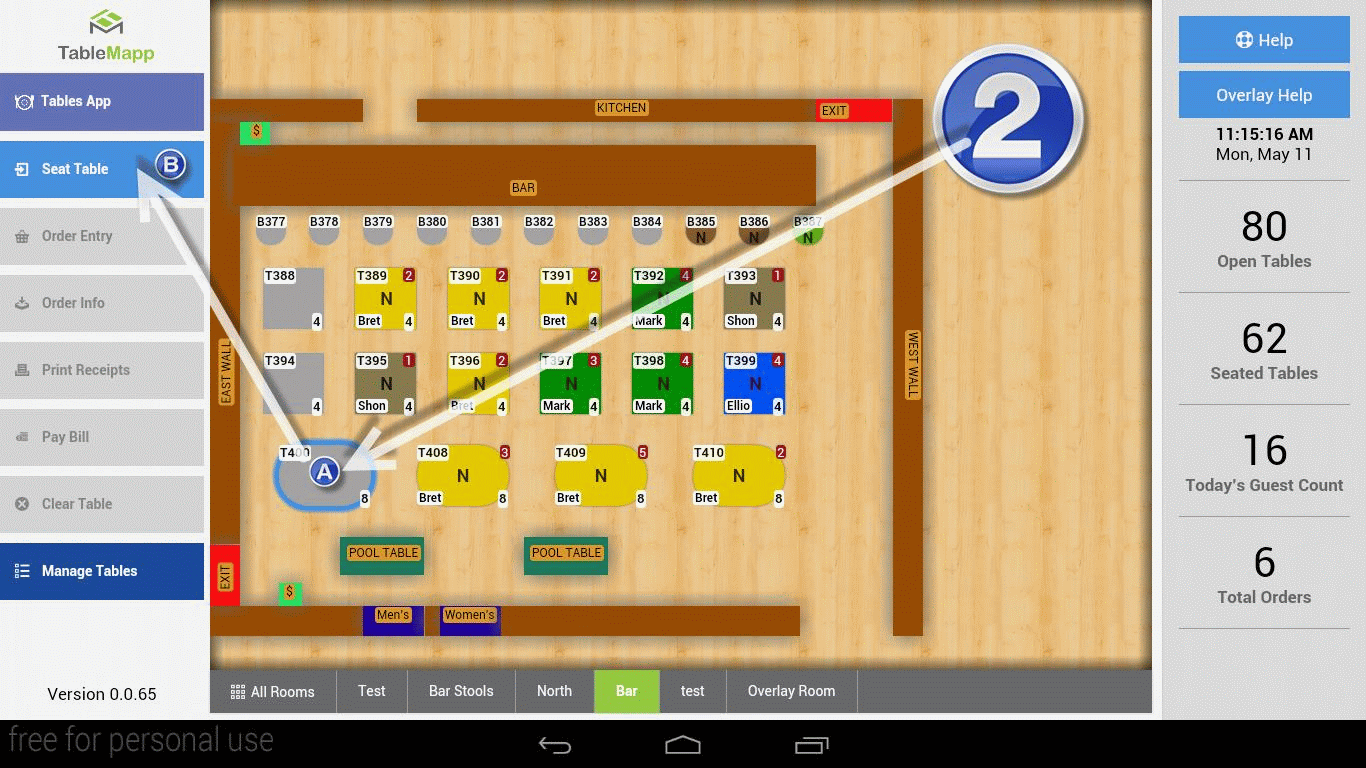
How to seat a table
There are two ways you may seat a table. Only tables that are gray may be seated.
1.
2.
3.
4.
1.
2.
Upper left-hand tells us the seat number or seat name
Bottom left-hand tell us the server for this table
The bottom right-hand tells us the seat capacity, or ho
Upper right-hand tells us how many are currently seated at a table
Option 1
a. Double tap any gray table.
Option 2
a. Single tap a gray table
b. Tap seat table from the menu bar

3 | P a g e
| Page 4 |
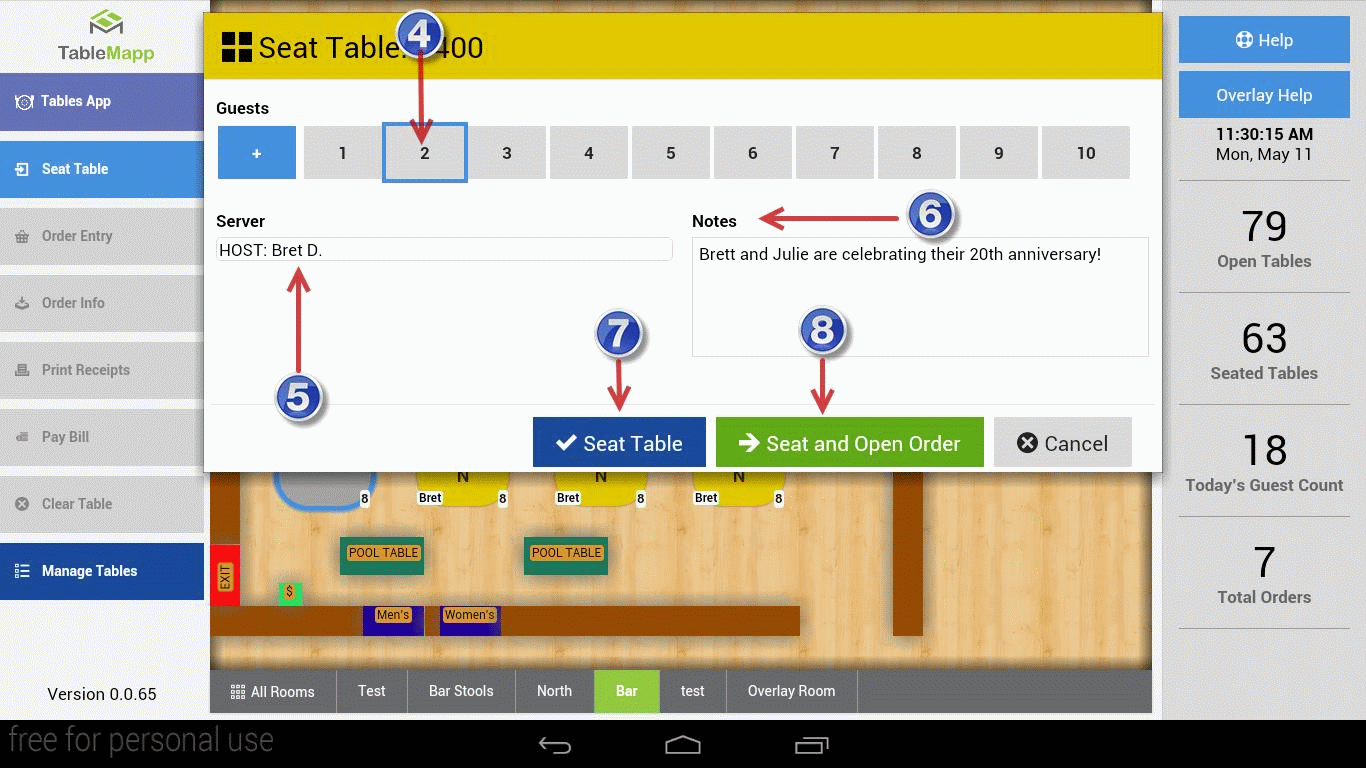
3.
4.
5.
6.
7.
8.
Both methods will bring up the Seat Table screen
Tap the number of guests you wish to seat
Choose the server you wish to have assigned to this order. The user will always be the defaulted
server.
You may create a note for a table too. These can later be accessed in the Order Info screen.
If you are simply seating the table, tap “Seat Table”
If you want to seat the table and then open the registers app right away, tap “Seat and Open
Order”
4 | P a g e
| Page 5 |
How to
1.
2.
3.
4.
complete an order
When you are ready to place an order, tap the table you wish to apply the order to. When
selected, you will see a blue outline appear on the table
Tap “Order Entry” located in the menu bar. This will open the registers app.
Here you can place your orders just as usual with the register app. When you are finished, you
may tap “Done”. This will bring you back to TableMapp.

Make sure your table is still selected, represented by a blue outline. Now tap the button labeled
“Fire.” This will print the order ticket at the appropriate printer.
5 | P a g e
| Page 6 |
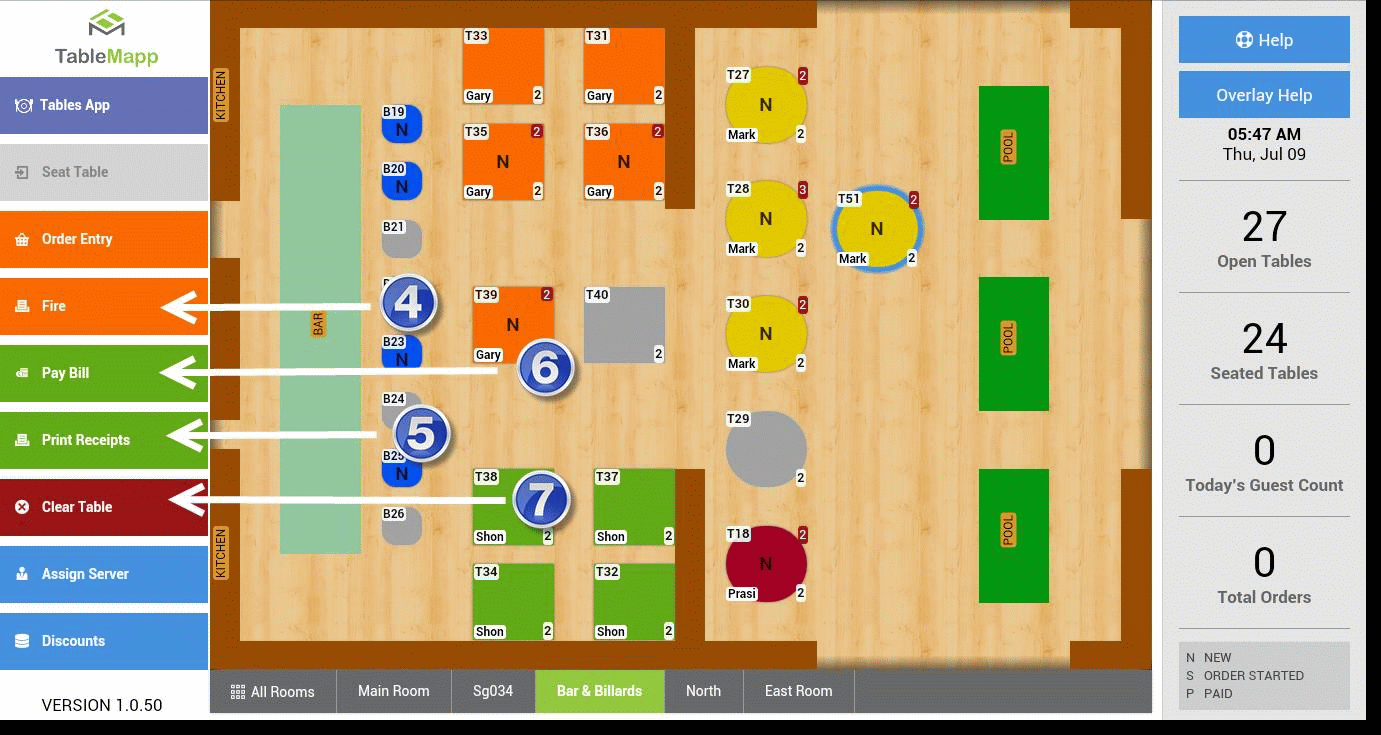
5. If you need to reprint any ticket, tap the table and then tap “Print Receipts”
6. When you are ready to pay the bill, tap the table and then tap “Pay Bill.” This will allow you to
close an order through the registers
7. Once payment has been completed and your table is cleaned and guests are gone, tap the table
then tap “Clear Table.” This will remove the guests and the server turning the table gray. This
means it’s ready to be seated again.
How do I switch rooms?
Rooms will be located at the bottom of the table map. Simply tap the name of the room you wish to
navigate to.
6 | P a g e
| Page 7 |
Where do I edit my TableMapp?
You can access this by opening TableMapp from your Clover.com Dashboard. You may also visit
www.seeddigitalmenu.com/manage to access the Seed Manage Site. If you try to login through here,

you will need to enter your email address and Clover pin which can be found in the Clover Employees
App. Only Admins and Managers will have access to the manage site.
Here you can build your restaurant layout. Start with adding walls, tables, changing your flooring, and
changing your table names.
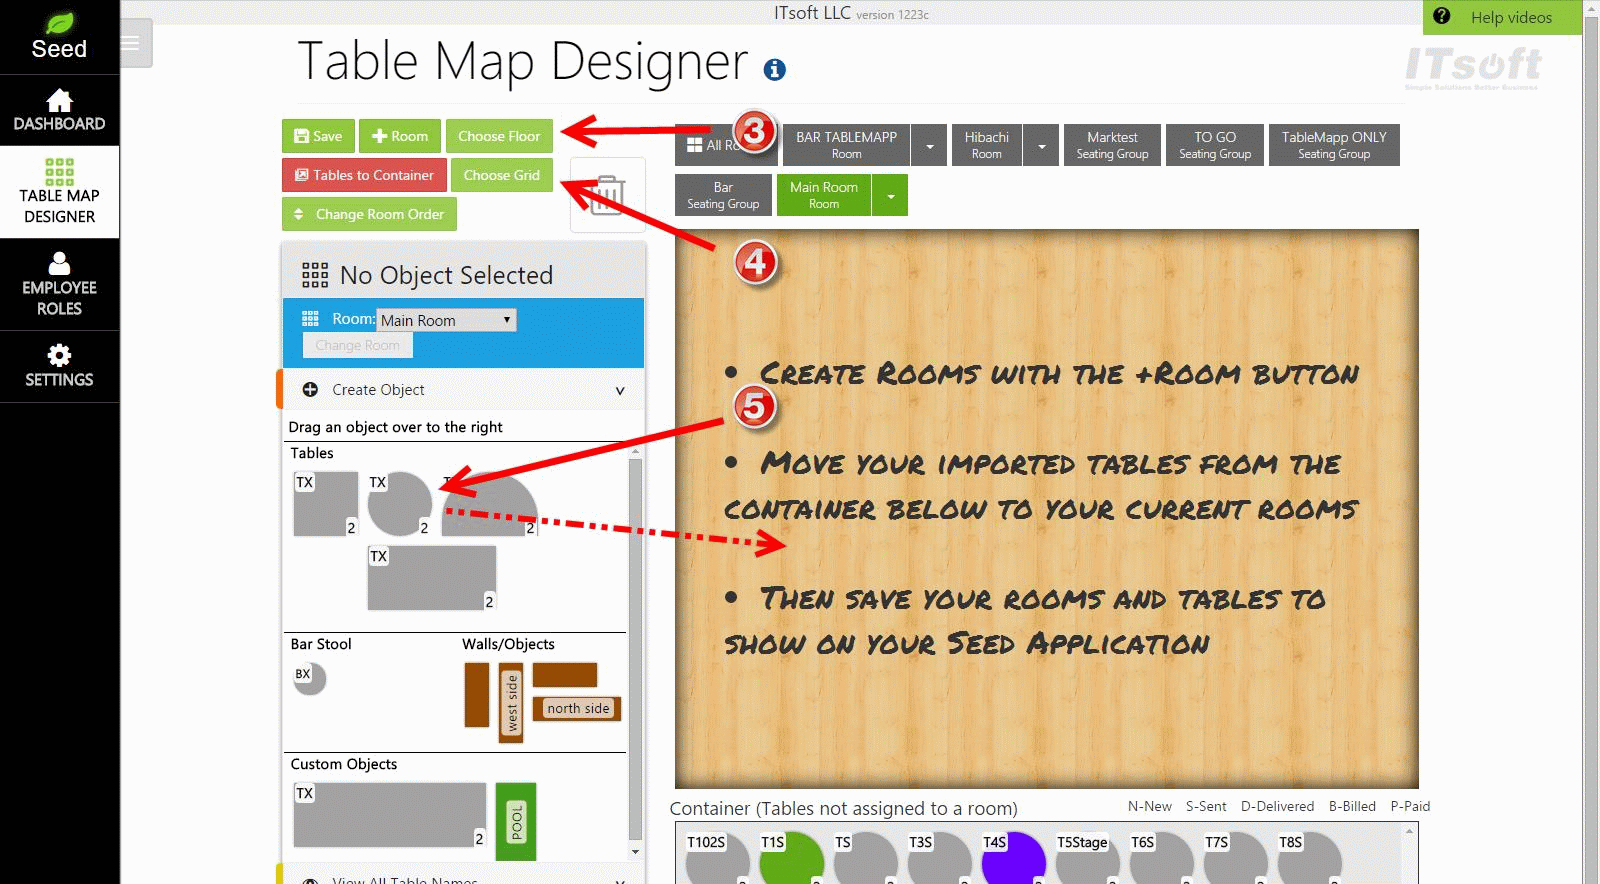
How do I create a new room?
The layout of TableMapp is completely customizable. To create, edit or remove anything on your
TableMapp, visit www.seeddigitalmenu.com/manage or login to your Clover Dashboard and choose

TableMapp. Use your clover credentials to gain access. If you do not remember, these can be accessed
by using the “Employees App” on your Clover.
1. Tap the “Table Map Designer” tab on the left menu bar. This will bring you to the Table Map
Designer where you can create you custom layout.
2. Just above the table map, tap the button “+Room”. This will begin the process of adding a new
room.
7 | P a g e
| Page 8 |
3.
4.
5.
6.

You can choose from 26 different flooring options
You may select the kind of grid to use for your design. You may choose from 12 inches, 6 inches,
or no grid.
Choose the object you would like to add by holding and dragging it to the table map. From there
you can place it anywhere you wish.
When a table is selected, certain features will appear on the left of the table map. Under
“Properties,” you will be able to edit the name of the table. The table name will be defaulted to
8 | P a g e
| Page 9 |
7.
8.
9.
the next number in your table number sequence. If you have tables 1-10 and you add a new
table, the defaulted name for your table will be 11.
There are two ways to adjust the size of your table. If you are on PC with a mouse, you can move
your curser to the bottom right-hand of the object and hold and drag to find the desired shape.
If you are on a tablet, you may use the sliders listed below to adjust the width, length, and
rotation.
Choose the correct number for seating capacity for this table.
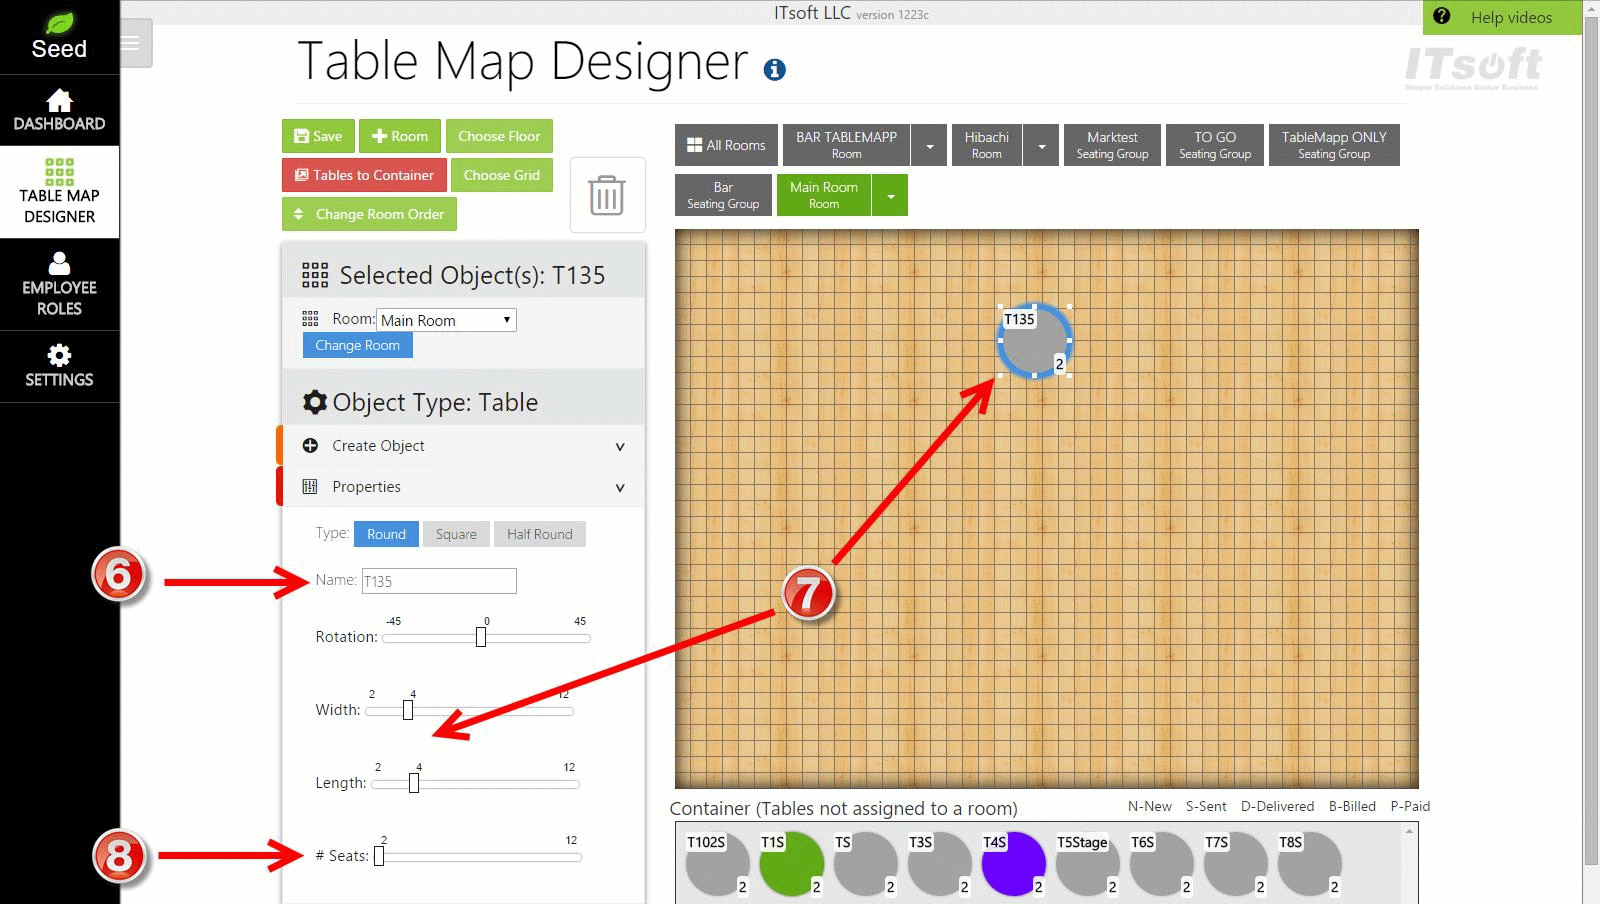
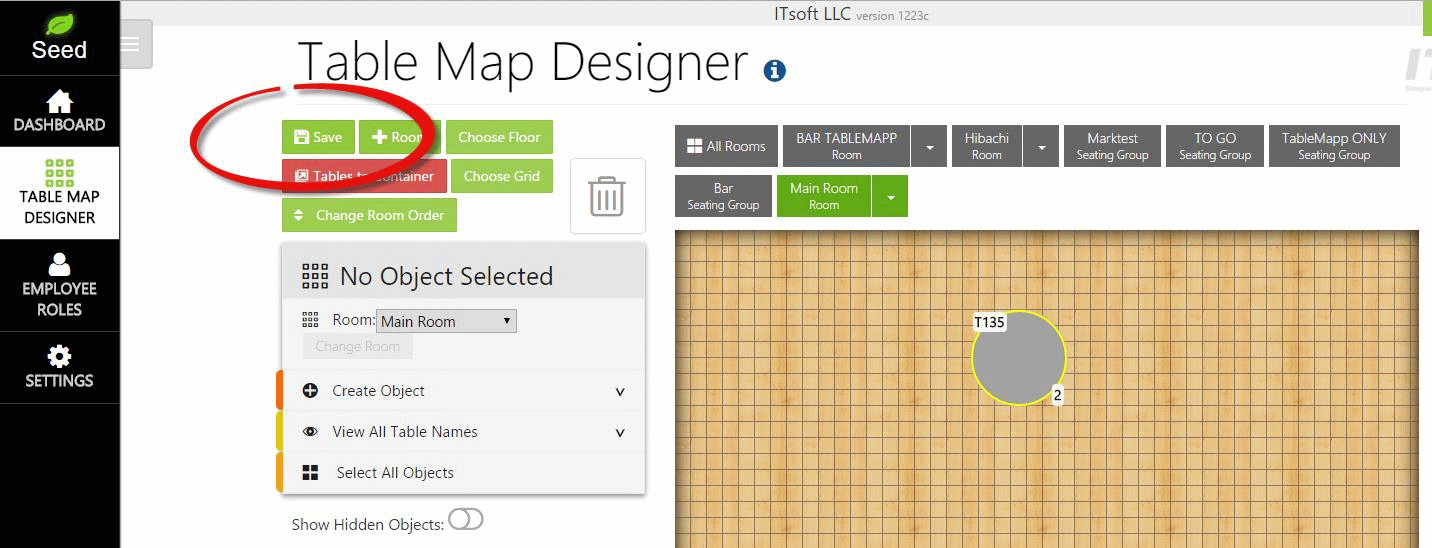
Before changes will be seen on TableMapp, YOU MUST SAVE YOUR LAYOUT. If you ever notice
a yellow outline around an object, it means that it needs to be saved.
9 | P a g e
| Page 10 |
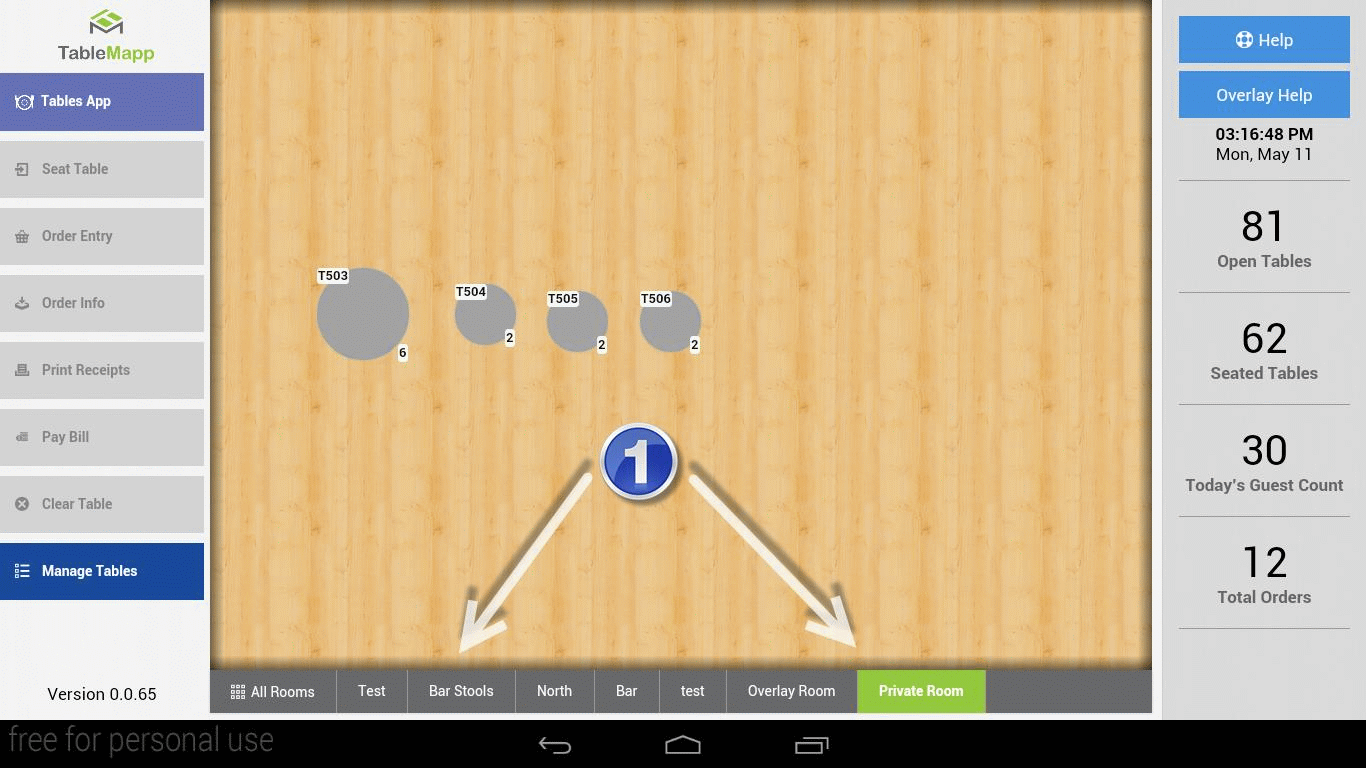
How do I delete a table/seating group from the map?
There are two ways to remove a table from TableMapp.
Option 1
1. Open the Tables App by tapping its button in the upper left of the menu bar
2. In the tables app, tap the tab “Manage Tables”
3. Find the table you wish to remove and tap the button “Remove”
Option 2
1. Go to the Manage Site through your Clover Dashboard or visit
www.seeddigitalmenu.com/manage and login.
2. From your table map, single tap the table you wish to remove. Once selected you will see a blue
outline of the table.
3. Hold and drag the table up to the trashcan icon. Release the table once it is located on the
trashcan. This will remove the table
4. You can also just hit delete if you are on a PC.
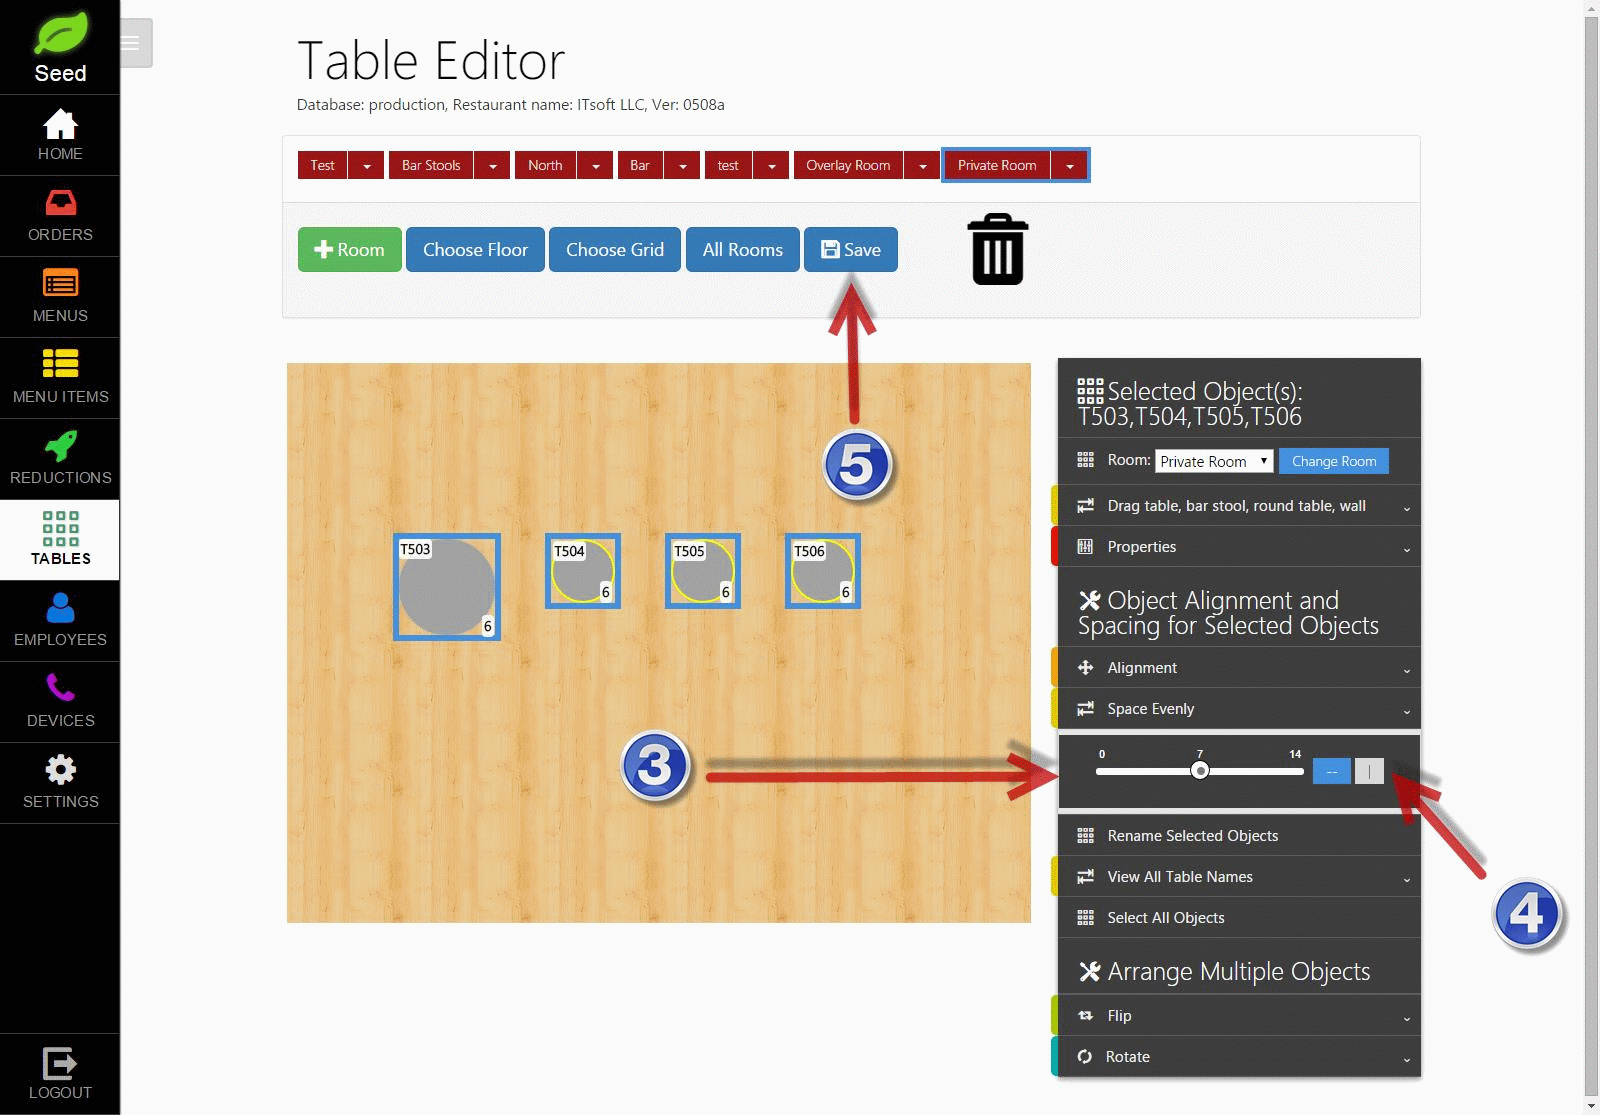
How do I evenly space my tables?
1. With your mouse, click and drag your curser to select the tables you wish to change. Any item in
the red box will be selected. Each table selected will be identified by a blue outline of the table.
2. Choose the tab on the right labeled “Space Evenly”
10 | P a g e
| Page 11 |
3.
4.
5.
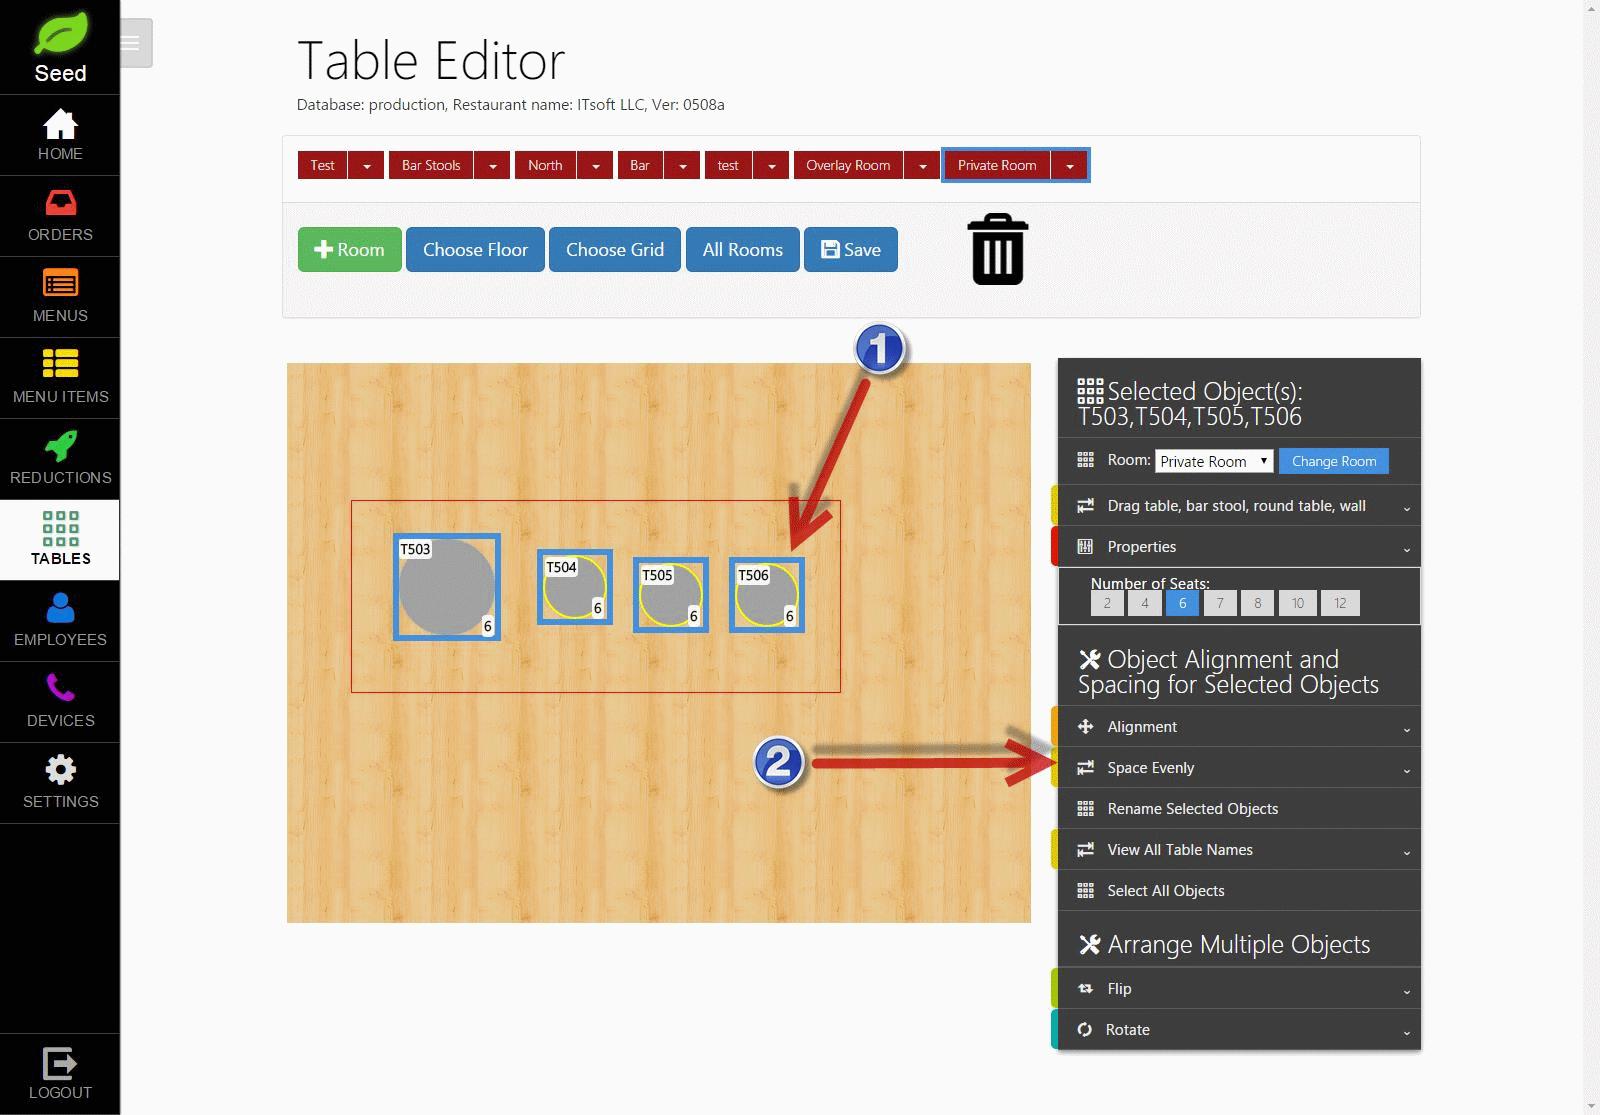
Slide the slider below to adjust the space between the tables.
If you spacing vertically, you need to switch to vertical spacing
When finished tap “Save”
11 | P a g e
| Page 12 |
What do the numbers on the right of the screen mean?
On the right side of the screen you will notice some statistics. This is general data that will give you
snapshot of how things are going for the day.
1. OPEN TABLES – This tells you how many tables are currently available for seating.
2. SEATED TABLES – This tells us how many tables are currently seated.
3. TODAY’S GUEST COUNT – This tells us how many guests have visited today. This includes guests
currently seated.
4. TOTAL ORDERS – This tells us how many orders have been placed today. This includes current
orders.
12 | P a g e
| Page 13 |
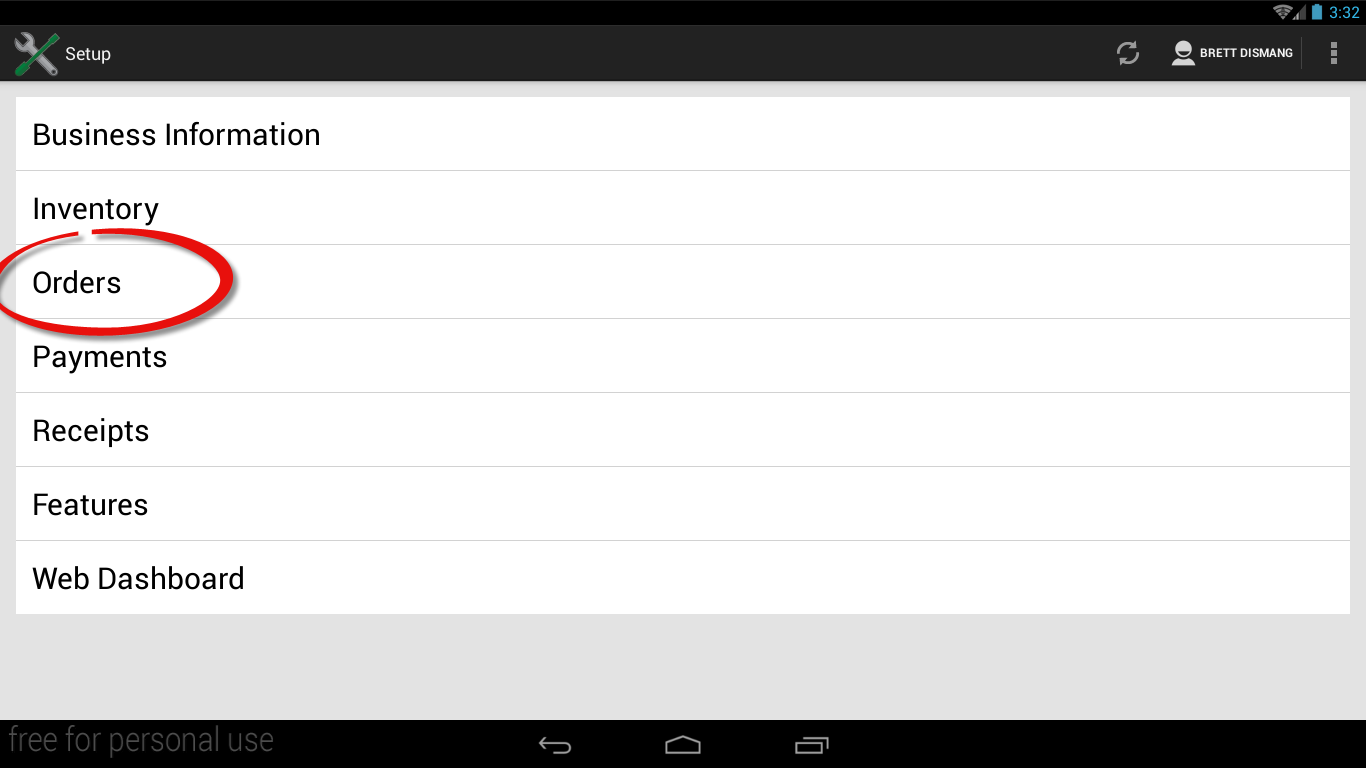
to print on my order ticket?
|
How do I get the table number
This can be established by changing a setting in the Clover Setup App.
1. Open the Setup App on your Clover device or your Clover Web Dashboard
2. Tap on “ORDERS”
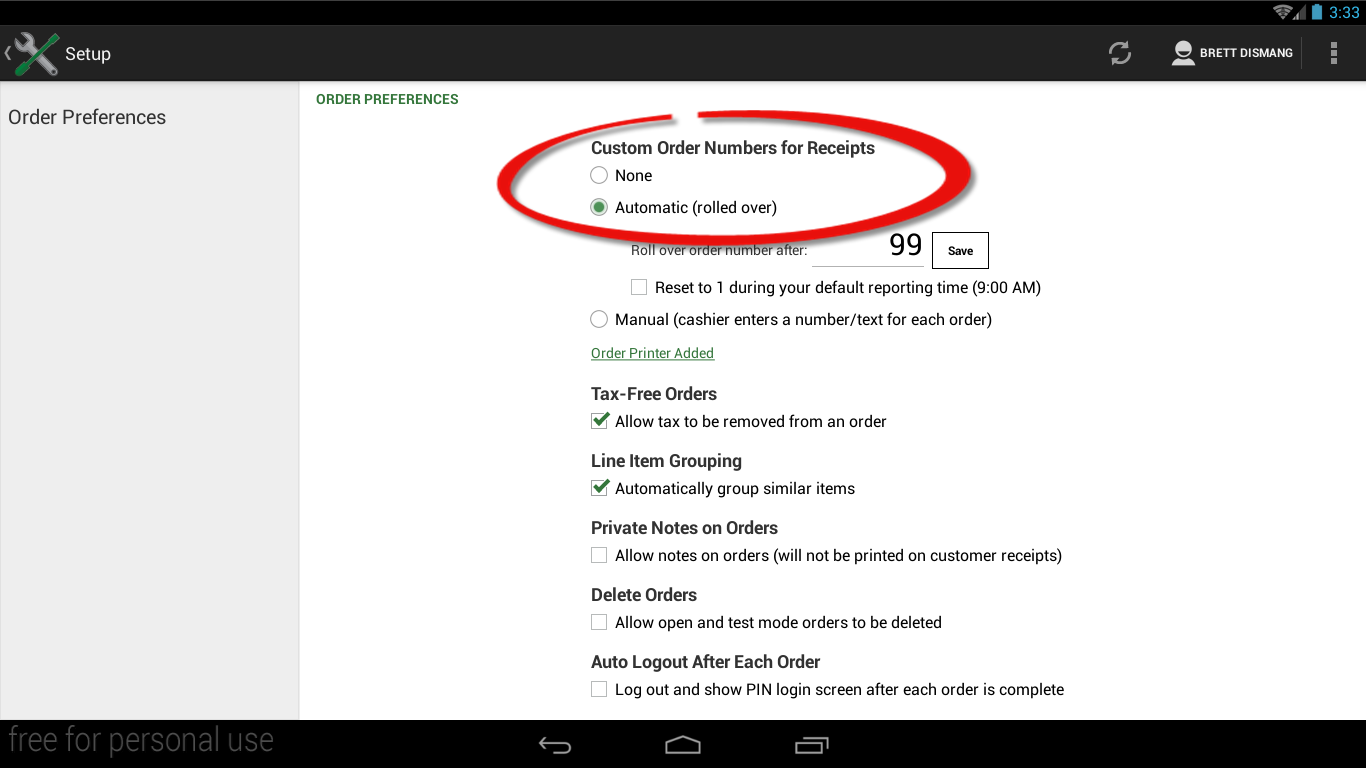
3. Under “Custom Order Numbers for Receipts”

13
P a g e
| Page 14 |
a. Choose “Automatic (rolled over).” This will allow the table number to be printed on the
kitchen receipt.
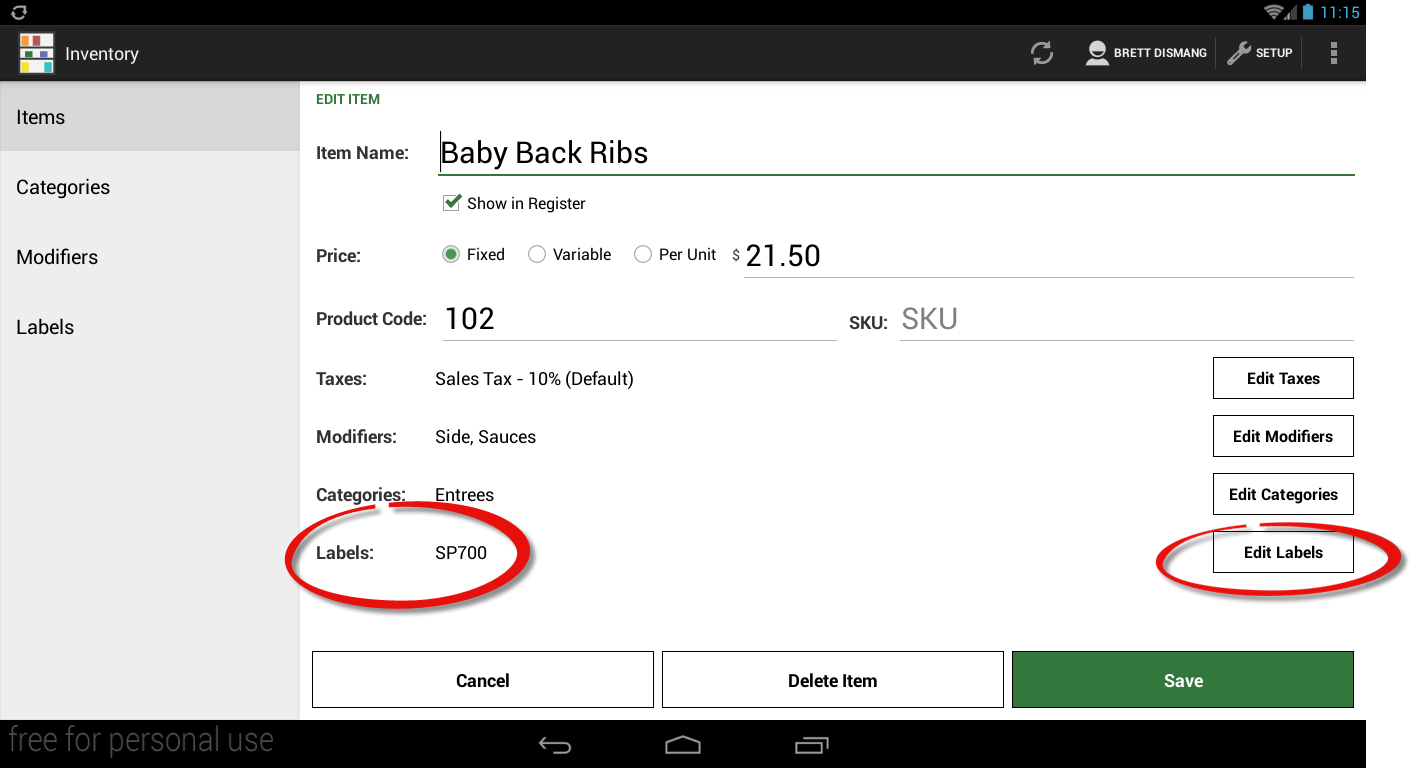
I just created new menu items, but they are not printing
TableMapp does not control any of the printing features for Clover. This is usually due to a label not
assigned to the menu item in the Clover Inventory App.
1. Open the Clover Inventory App and find the menu item that is not printing.
2. At the bottom of the page, the last section is called “Labels.” Click the button “Edit Labels.”
14 | P a g e
| Page 15 |
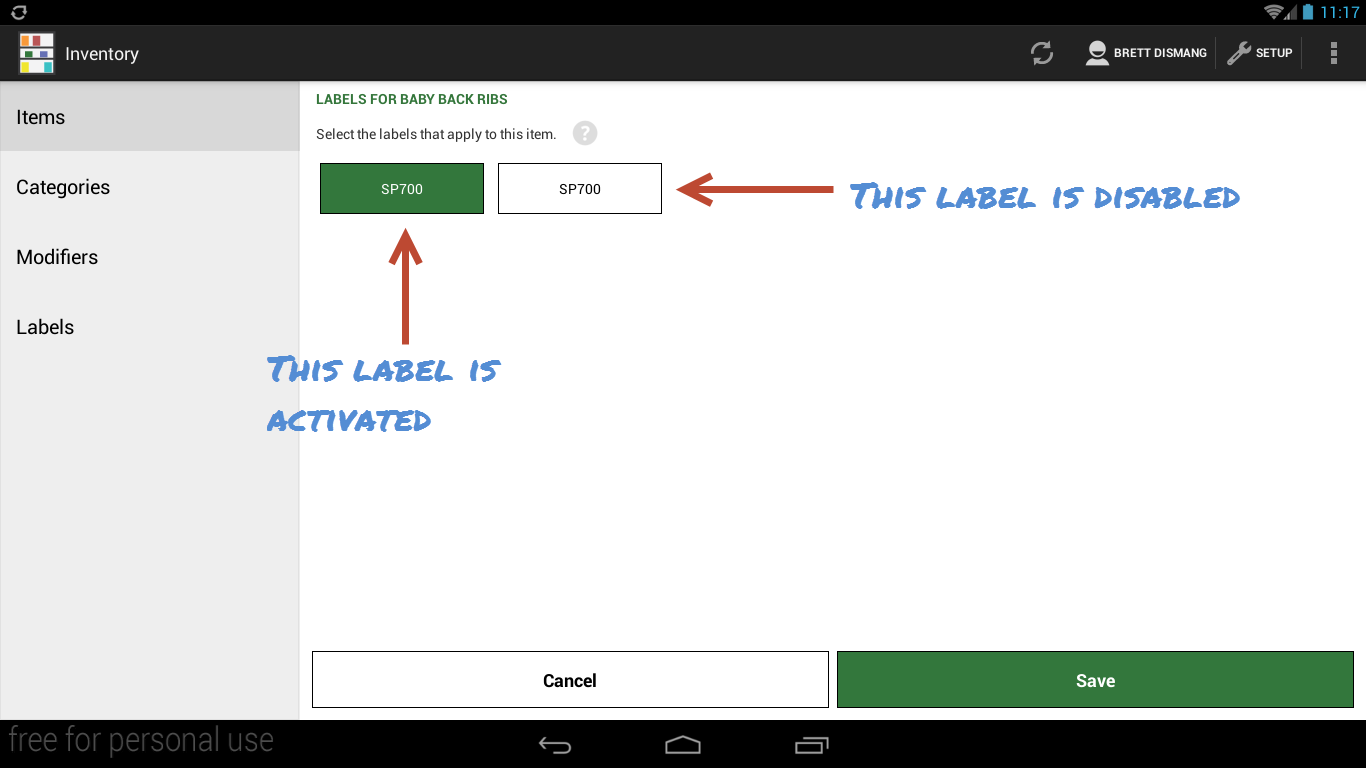
3. Find the label that should be applied to this item. If it is green, that means that it is tied to this
menu item and will print. If it is white, this means that it is disabled. Tap the label to change it
from white to green.
Orders are printing from some devices, but not others
TableMapp does not control any of the printing for Clover. This is probably due to a setting in the
Clover Printers App. Follow these steps on each device that is not printing items.
1. Open the Clover Printers App on the device that is not printing orders

15 | P a g e
| Page 16 |
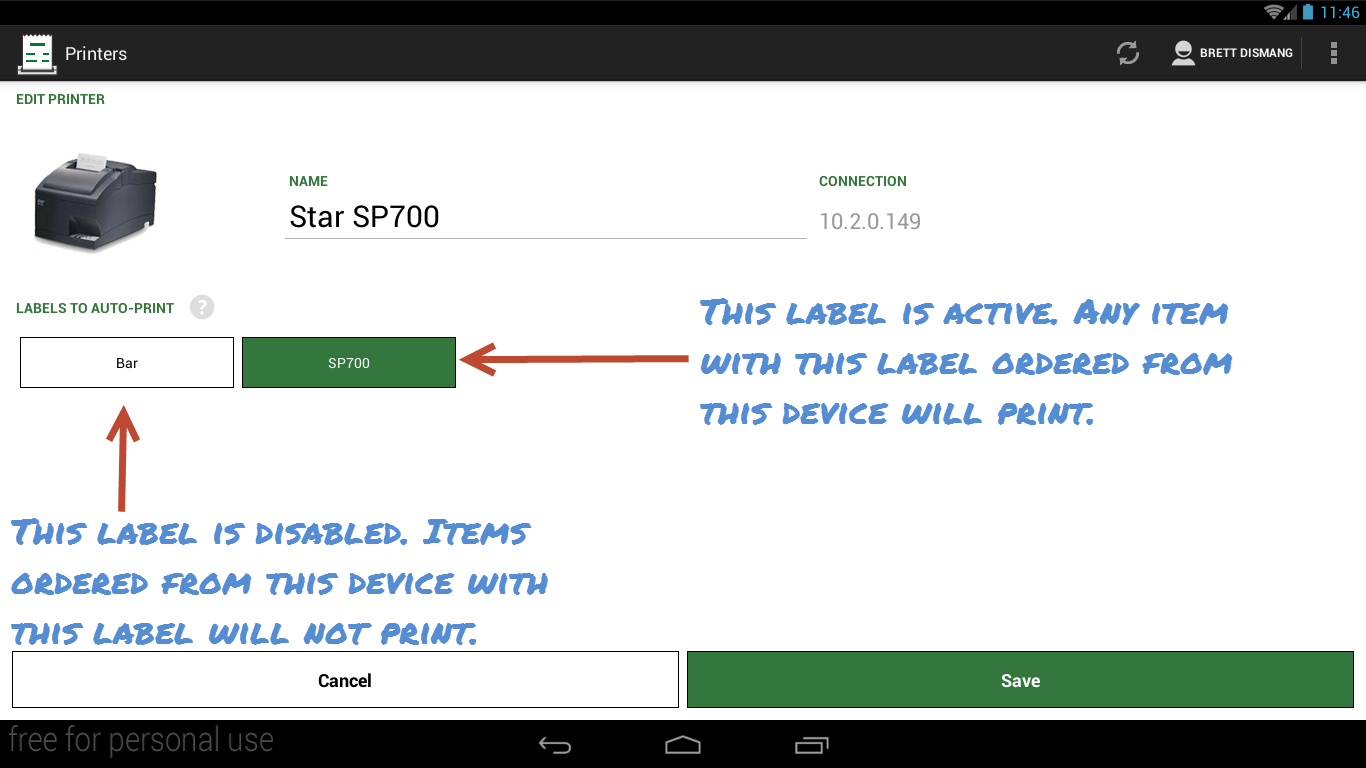
2. Find your first printer that should receive orders and tap “Edit”.
3. View the labels that are active. Any item that has a green label will print when ordered from this
device. If they label is white, any item with that label will not print when ordered from this
device. This must be changed on each device as this feature will not sync will all devices when
changed.
The app is running slow
This is usually due to a slow internet speed or a poor connection. Below are a few suggestions to help
speed up the app.
You should have a network dedicated to supporting only your Clover devices. The more devices
you have connected to a network, your network speed will be reduced. You can check your
download speed by visiting www.speedtest.net. We recommend a download speed of at least

10 mbps.
Make sure all your Clover Stations are hardwired to your network. This means that you
physically have it connected and not running on the Wi-Fi.
Keep your network for your Clover devices closed. Do not use for guest Wi-Fi access. Do not
allow employees to connect their personal devices to this network either.
I made changes to my existing floorplan but my app does not show
these changes
While most changes are updated automatically, some changes require the app close and reopen. Each
time TableMapp opens, it is checking to see if there have been any changes
16 | P a g e
| Page 17 |
1.
2.
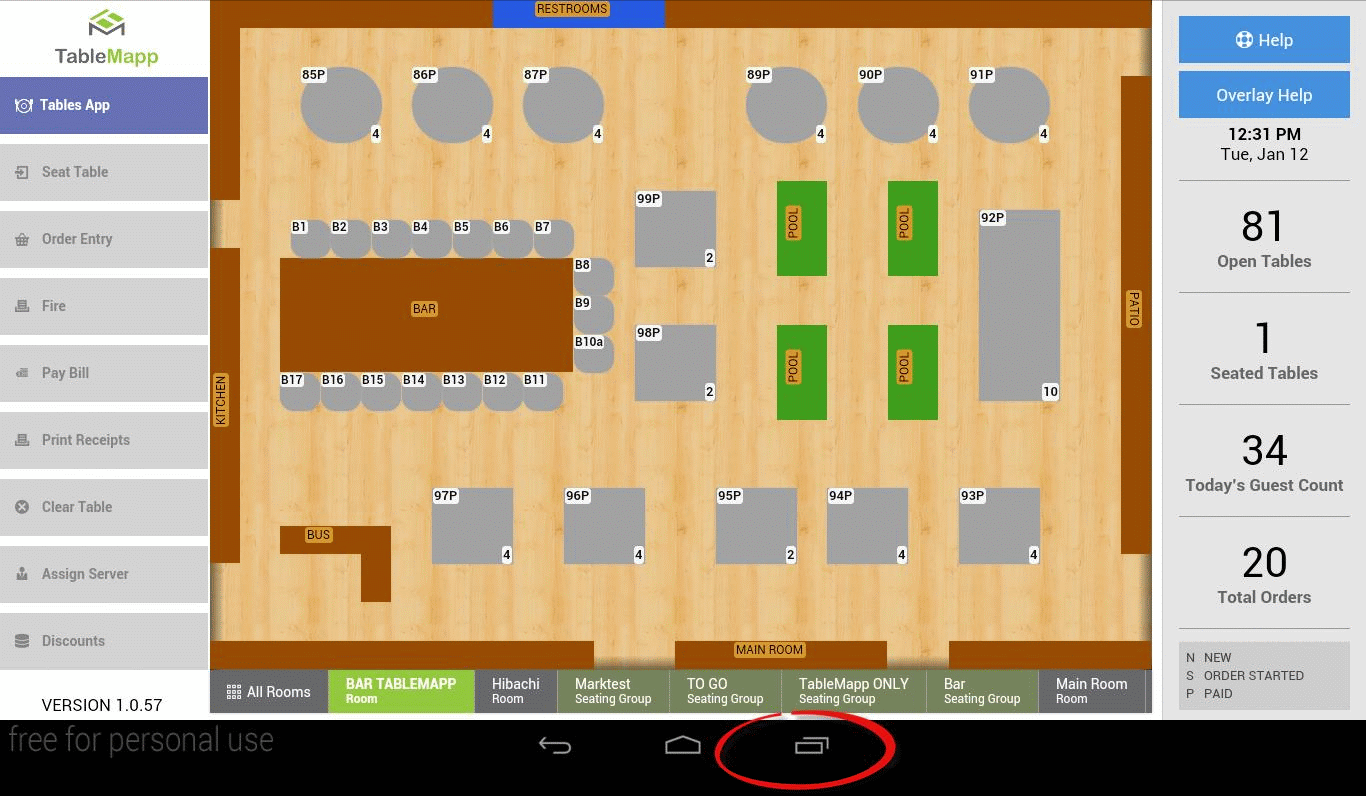
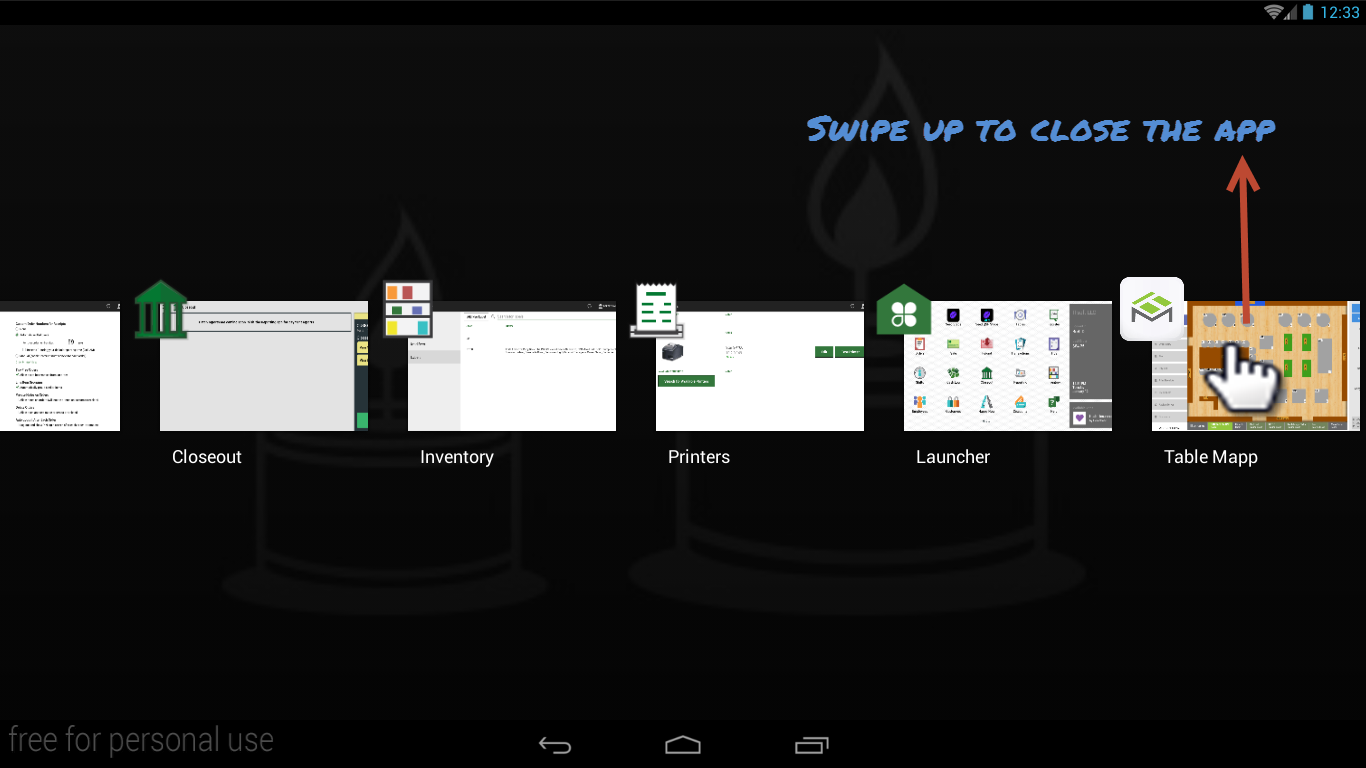
Tap the “Active Apps” button at the bottom of your device. This is located just to the right of
the Home button. This will show you all the apps your currently have open.
Find TableMapp and swipe up on the app to close it. Touching the home button does not close
the app. The home button simply puts the app in the background. Once it is closed, reopen the
app to see the changes.
17 | P a g e
| Page 18 |
How do I limit my employees from accessing tables/orders that are not
theirs?
This is a feature that can be enabled or disabled from the Seed Manage site under Settings.
1. Log into your Clover Dashboard on www.clover.com

2. On your dashboard, click on TableMapp. This will take you to the Seed Manage site.
3. Once you are in the Seed Manage Site, click on Settings on the left side of the screen.
4. Under Options, find “Prevent Employees from Opening Other Servers Orders.” Go ahead and
ENABLE this setting. Once you have done this, anyone with the role of EMPLOYEE in Clover will
only have access to their tables. Users with the role of ADMIN or MANAGER will still have access
to all orders.
18 | P a g e